Engineering Spec 01: Authentication and Authorization Flow
Changelog
Current version: v1.
Summary
This engineering specification concerns the full flow of authentication and authorization for the app, is subjected to changes at any time during the iterative process.
To recap, authentication section will concern the process of registering and logging in, and how to properly save the user credentials as well as what to do to adhere to OWASP best practices. Authorization section will concern the process of validating and granting permissions to permitted resources after logging in succeeded.
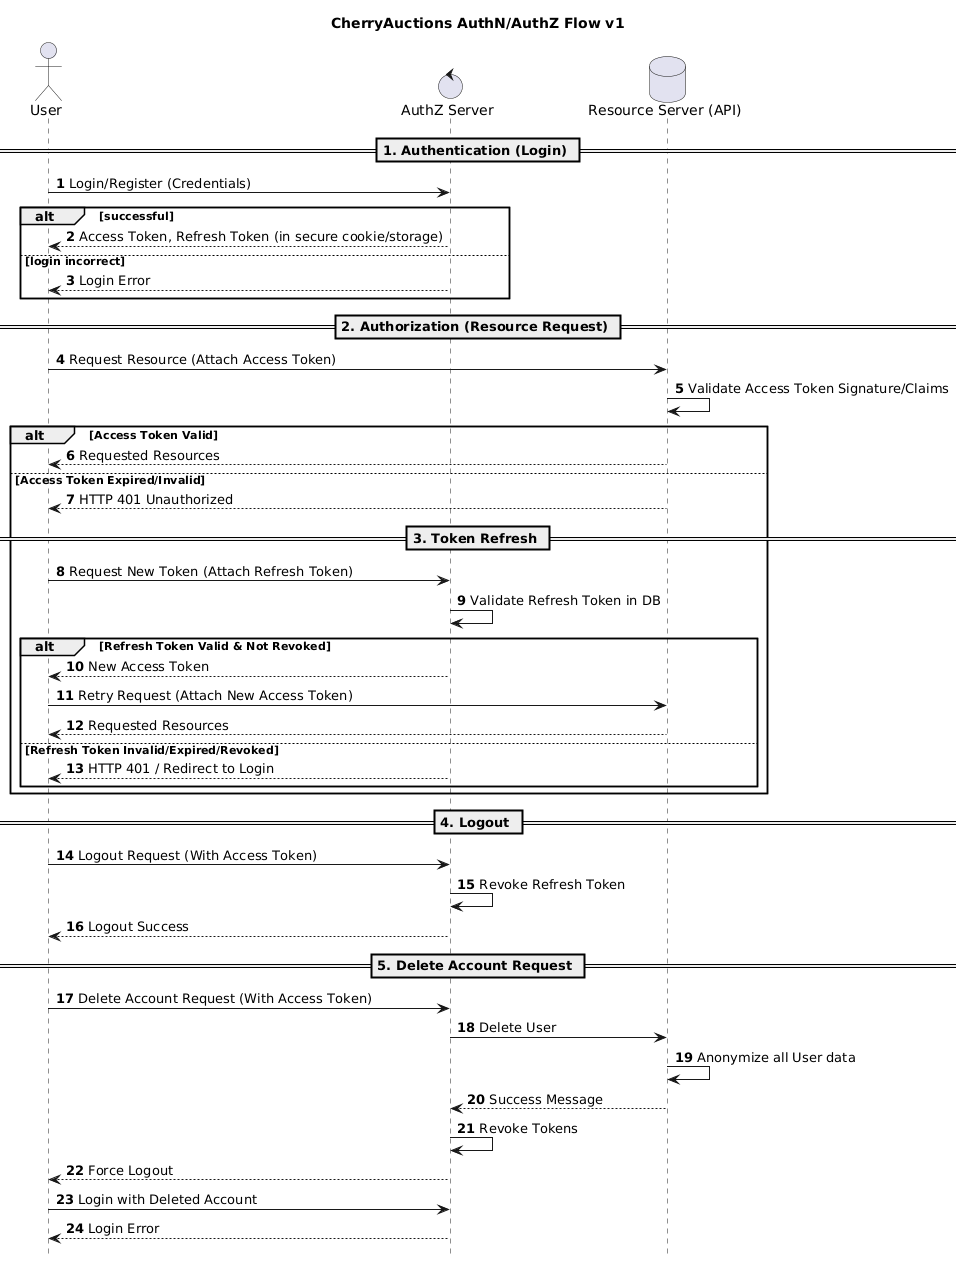
User Flow
High-level user flow for the requirement to use “JWT Access Key / Secret Key” as a mechanism.
Authentication and Authorization
The mechanism above will be implemented using PKCE, or Proof Key of Code Exchange under OAuth standards.
Reasons:
- This is a public key, it should be used in the frontend, which exposes everything, so a client secret is not possible. Same with mobile apps.
- PKCE provides strong protection against various mechanisms of stealing credentials, as well as also adheres strongly to the requirement for a JWT key pair.
Preconditions
A Client ID should be registered directly on the backend for the SPA frontend to use, but the method of how that can be registered is out of scope for this specification.
The Client ID will be marked as client_id for the flow. The Client ID is an opaque token, registered with the backend, that links itself with a callback_uri. This callback_uri is the callback destination for the backend to redirect the user to after authentication and authorization.
The Client ID and the Callback URI shall be different for each environment, such as:
local-appandhttp://localhost:3000/callbackfor Local Developers Environment.stg-appandhttps://stg.example.com/callbackfor Staging Environment.prod-appandhttps://example.com/callbackfor Production Environment.
Due to constrained resources, Staging Environment is T.B.D and may be omitted entirely in the final project.
Step 1. Client generates a Code Verifier
The public client may generate a code verifier, which has to satisfy the following:
- Must be cryptographically random using digits, ASCII characters, and special characters limited to
_,.,~and-. - Must have a minimum length of 43 characters after encoding in Base64 URL and a maximum length of 128 characters. This specification suggests 64 characters as the middle compromise, but it ultimately depends on the implementer.
Step 2. Client generates a Code Challenge
Using the code verifier, the client creates a code challenge derived from it.
There are two ways to generate a code challenge, ultimately depending on whether the client has the means to do a SHA-256 hash. If it can, prefer it over using plain text.
- If using
plain, thecode_challengeis exactly equal to thecode_verifier. - If using
s256, thecode_challengecan be computed by taking the sha-256 hash of the ASCII version ofcode_verifier, and THEN apply a base64-url encode on the hash to get the code challenge.
The plain transformation is only meant for integrating with legacy systems.
Step 3. Client sends an Authorization Request
The client must send an authorization request to the authorization server according to RFC 6749 specifications. It must be a request, that conforms to the following:
- The request must use
application/x-www-form-urlencodedformat. - The request body must contain the following fields:
response_typemust be set tocode.client_idas required in the precondition.redirect_urias the URI to redirect to, should match exactly to the registered URI with the client.scope(optional) as the scope of the client as registered with the client, can be omitted if we don’t save the scope. Otherwise, it is a string of space-delimited scopes, where each scope is case-sensitive.state(optional, but recommended) as an opaque value generated by the client to maintain some state between callbacks. The authorization server includes this value when sending back to the client, as this prevents Cross-Site Request Forgery.code_challengeas the value generated from step 2.code_challenge_method(optional), if omitted, the authorization server shall default toplain. Useplainors256depending on what step 2 did to generate the code challenge.
Step 3A. If the request failed
In the cases that the request failed due to missing, invalid, or mismatching URIs, or if the client ID (and/or secret) is missing or invalid, the authorization server MUST NOT redirect to the configured redirect URI.
If the request fails for other reasons, it can be redirected, with the information of what happened using application/x-www-form-urlencoded format:
error: The type of error, must be an ASCII string from the following:invalid_request: The request is missing a required parameter, includes an invalid parameter value, includes a parameter more than once, or is otherwise malformed.unauthorized_client: The client is not authorized to request an authorization code using this method.access_denied: The resource owner or authorization server denied the request.unsupported_response_type: The authorization server does not support obtaining an authorization code using this method.invalid_scope: The requested scope is invalid, unknown or malformed.server_error: Server-side error. This is needed because a 500 HTTP code cannot be used as a redirect.temporarily_unavailable: The authorization server is currently overloaded or down for maintenance. Similar reason toserver_erroras 503 HTTP code cannot be used as a redirect.
error_description(Optional): Human-readable value of what that error code means.state(REQUIRED if the request contained one): Exact value received.
The error code that will be used mostly would be invalid_request and unauthorized_client, as others are not commonly encountered in our use case. This may be subjected to be changed in the future.
Step 4. The Server Callbacks
IMPORTANT! When the server generates an authorization code to be sent back to the client, it must have a way to associate the code challenge and the code challenge method with the code to be verified later.
This specification recommends appending such data into the code and encrypt it so that it can be re-verified later on the server side with the key, but storing it in a database or a safe cache to associate them is also a viable option. The server MUST NOT include the code_challenge in ANY OTHER form that a malicious client can extract.
The exact method to use is undefined for the specification RFC 7636.
The lifetime of the authorization code must be saved somewhere, that it has a maximum of TEN MINUTES, no more.
Step 5. Client requests a token
The client can now request a token from the authorization server on a token endpoint using application/x-www-form-urlencoded format. Includes the following:
grant_typemust be SET toauthorization_code.codemust be SET to the code received from the authorization server, also called the authorization code.redirect_urimust be SET to exactly the same string as the one registered with the server.client_idmust be SET to the client for that public SPA.code_verifiermust be SET to the original verifier the SPA generated. This is to help the authorization server verifies the code embedded inside theauthorization_code. This verifier is NOT hashed.
Step 6. Server verifies code verifier before sending back a token
The server extracts the code_challenge out of the authorization code received from the client, and compares it based on the code_challenge_method also embedded into the authorization code:
- If the method is plain, a direct string comparison may take place:
code_verifier == code_challenge. - If the method is s256, the received “code verifier” is hashed with s256, base64-url encoded and then compared to the
code_challenge.
Step 6A. The server verifies successfully
The server now sends back a set of tokens as requested by the client, using a 200 HTTP status code.
access_token: The short-lived token issued by the authorization server to authenticate and authorize with the resource server.token_type:expires_in(recommended): The lifetime in seconds of the access token. If omitted, the authorization server must document somewhere about this lifetime. Recommended to be 3600.refresh_token(optional): The refresh token that can be used to generate a new access token as described below.scope(optional): Not implemented in our system. Subject to change.
Step 6B. The server failed to verify
The server fails to verify the codes, and return it as a 400 HTTP status response, with the following body:
error:invalid_request: The request has a missing parameter, includes an unsupported parameter value, repeats one, or have multiple mismatched credentials.invalid_client: The client authentication failed (unknown client, no suitable authentication method if for private clients). The authorization server may return this as a 401 HTTP code.invalid_grant: The provided grant type, such as authorization code is not supported, or the refresh token is invalid, revoked or expired.
error_description(optional): Human-readable version of the above error types.
Step 7. The client requests a resource
When the client requests a resource, it uses only the access token, as the resource server does not have authority over the refresh token.
For the web application, the access token and the refresh token may be returned as HTTP only cookies, instead of saving somewhere else like localStorage. For mobile apps, using technologies like iOS Keychain to store such tokens is valid.